Income
At the end of each battle, a warband may roll on the Exploration chart. This is done as soon as a game is over so that players can witness each other’s dice rolls. As you can see from the chart, a warband that is just starting out has little chance of finding the more obscure places in Mordheim. However, a warband will make more discoveries as it goes along thanks to its better equipment and accumulated skills.
Roll a D6 for each Hero in your warband who survives without going out of action. This represents the warband’s efforts to unearth wyrdstone. Do not roll for any Heroes who went out of action during the battle; they are taken back to the warband’s encampment to recuperate instead. So, for example, if your warband includes four Heroes who all survived the last battle, you can roll four dice. If you won your last game, you may roll one extra dice. Add the results of the dice together and consult the Exploration chart to see how many shards of wyrdstone your warband has found.
Do not roll for Henchmen. This does not mean that they don’t search the ruins, but instead represents the efforts of the Heroes in coordinating the search parties. In addition, some Henchmen like Zombies or Warhounds (for obvious reasons) are not particularly useful when it comes to looking for wyrdstone.
rolling multiples
As well as finding shards of wyrdstone, the warband can come across unusual places or encounter inhabitants of the ruined city. If you roll two or more of the same number while searching, you have found an unusual building or encountered something out of ordinary. Consult the chart and refer to the appropriate entry in the Exploration results.
For example, you might roll two 3’s or three 5’s, in which case you should refer to the chart. Choose the most numerous multiples if you score more than one set of multiples. So, if you rolled a double 3 and a triple 5, only look up the triple 5 on the Exploration chart. In the case of two doubles or triples look up the highest result. For example, if you rolled double 1 and double 3, look up the double 3 result.
Any money or loot you find in these locations is added straight to the warband’s treasury. Any shards of wyrdstone you find can be sold as normal.
exploration procedure
- Roll 1D6 for each of your Heroes who survived the battle and one extra dice if you won, plus any extra dice allowed by skills or equipment. Note, however, that you must pick a maximum of six dice out of all the dice you roll, even if you are allowed to roll seven dice or more.
- Some things, such as skills and equipment, (like the Mordheim Map) may allow you to re-roll dice. If your warband includes an Elf Ranger, you may modify one dice by +1 or -1.
- If you rolled any doubles, triples, etc, you have found an unusual location in Mordheim. Consult the Exploration chart below to see what you find. Refer to the appropriate entry on the following pages and follow the instructions given there.
- Add the results together and consult the chart below to see how many shards of wyrdstone you have found. Mark down the amount of wyrdstone on your warband’s roster sheet.
Number Of Wyrdstone Shards Found
| Dice Result | Shards Found |
|---|---|
| 1-5 | 1 |
| 6-11 | 2 |
| 12-17 | 3 |
| 18-24 | 4 |
| 25-30 | 5 |
| 31-35 | 6 |
| 36+ | 7 |
Example: The Sellswords, a Reiklander warband, have just won a battle. Three of their Heroes survived and the warband discovered the Entrance to the Catacombs in an earlier battle. This means that the warband may roll four dice and re-roll one of them. The player rolls 5, 5, 1 and 3. He then picks one of the dice (the 1) and re-rolls it. He scores a 4. His warband also includes an Elf Ranger, so he can modify one of the dice rolls by +1/-1. The player decides to turn the 4 into a 5, giving him a grand total of 5, 5, 5 and 3. This means that the warband has found four shards of wyrdstone (5+5+5+3=18 which according to the table above gives the warband four shards) and the three 5’s produce a ‘Market Hall’ result on the Exploration chart.
selling wyrdstone
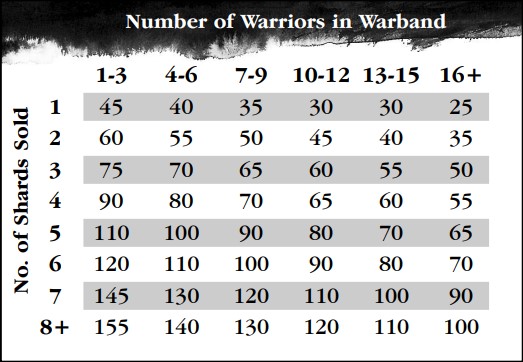
Wyrdstone is tremendously valuable and is in constant demand by Imperial nobles. This means that finding buyers for your warband’s wyrdstone is not difficult. You do not have to sell all your wyrdstone immediately after the battle – you may want to hoard it and sell it later, as selling wyrdstone in smaller quantities will increase demand and raise the price. Unfortunately, the demands of running a warband often mean that you will have to sell most of your wyrdstone as soon as you find it.
The warband must spend a large portion of its income on basic necessities such as food, drink, repair of weapons, and new arrows and ammunition, as well as celebrating! A warband leader is also expected to share any profits made by selling wyrdstone between his men which means that the more money the warband makes from such sales, the bigger the share for the men.
The more models there are in the warband, the more it costs to maintain and the higher the level of any profits made that must be shared between the men. The number indicated on the following chart is the profit in gold crowns earned after deducting the warband’s maintenance costs. The profit is added to the warband’s treasury.
Exploration chart
DOUBLES
| Combination | Result |
|---|---|
| 1 1 | Well |
| 2 2 | Shop |
| 3 3 | Corpse |
| 4 4 | Straggler |
| 5 5 | Overturned Cart |
| 6 6 | Ruined Hovels |
TRIPLES
| Combination | Result |
|---|---|
| 1 1 1 | Tavern |
| 2 2 2 | Smithy |
| 3 3 3 | Prisoners |
| 4 4 4 | Fletcher |
| 5 5 5 | Market Hall |
| 6 6 6 | Returning a Favour |
FOUR OF KIND
| Combination | Result |
|---|---|
| 1 1 1 1 | Gunsmith |
| 2 2 2 2 | Shrine |
| 3 3 3 3 | Townhouse |
| 4 4 4 4 | Armourer |
| 5 5 5 5 | Graveyard |
| 6 6 6 6 | Catacombs |
FIVE OF KIND
| Combination | Result |
|---|---|
| 1 1 1 1 1 | Moneylender’s House |
| 2 2 2 2 2 | Alchemist’s Laboratory |
| 3 3 3 3 3 | Jewelsmith |
| 4 4 4 4 4 | Merchant’s House |
| 5 5 5 5 5 | Shattered Building |
| 6 6 6 6 6 | Entrance to the Catacombs |
SIX OF KIND
| Combination | Result |
|---|---|
| 1 1 1 1 1 1 | The Pit |
| 2 2 2 2 2 2 | Hidden Treasure |
| 3 3 3 3 3 3 | Dwarf Smithy |
| 4 4 4 4 4 4 | Slaughtered Warband |
| 5 5 5 5 5 5 | Fighting Arena |
| 6 6 6 6 6 6 | Noble’s Villa |
Doubles
(1 1) Well
The public wells, of which there were several in Mordheim, were covered by rooves raised up on pillars and adorned with carvings and fountains. The city was proud of its water system. Unfortunately, like all the other wells, this one is in a parlous state and undoubtedly polluted with wyrdstone.
Choose one of your Heroes and roll a D6. If the result is equal to or lower than his Toughness, he finds one shard of wyrdstone at the bottom of the well. If he fails, the Hero swallows tainted water and must miss the next game through sickness.
(2 2) Shop
The Merchants Guild shop has been thoroughly ransacked. Even so, there are still items scattered around the single, long room, mingled in with the rubble. Some are useful, such as cast iron pots and pans and rolls of fine cloth. All manner of smaller items are lying about – the sort of frippery which no longer has a use in a devastated city with few inhabitants.
After a thorough search you find loot worth D6 gc. If you roll a 1 you will also find a Lucky Charm.
(3 3) Corpse
You find a still-warm corpse. A chipped dagger sticks out of his back. Surprisingly, his possessions have not been looted.
To see what you find when you search the corpse, roll a D6:
| D6 | Result |
|---|---|
| 1-2 | D6 gc |
| 3 | Dagger |
| 4 | Axe |
| 5 | Sword |
| 6 | Suit of light armour |
(4 4) Straggler
Your warband encounters one of the survivors of Mordheim, who has lost his sanity along with all his worldly possessions.
Skaven warbands can sell the straggler to agents of Clan Eshin (who will use the man for food or slavery) and gain 2D6 gc.
Possessed warbands can sacrifice the unfortunate individual for the glory of the Chaos gods. The leader of the warband will gain +1 Experience.
Undead warbands can kill the man and gain a Zombie for no cost.
Any other warband can interrogate the man and gain insight into the city. Next time you roll on the Exploration chart, roll one dice more than is usually allowed, and discard any one dice. (For example, if you have three Heroes, roll four dice and pick any three).
(5 5) Overturned Cart
Stuck in a ruined gateway is an overturned wagon – the covered type that nobles travel in from the city to their estates in the country. Since anyone important fled a long time ago, what is it doing here? The horses have broken their traces, or did someone cut them free?
Roll a D6 to see what you find:
| D6 | Result |
|---|---|
| 1-2 | Mordheim Map (see Equipment) |
| 3-4 | A purse with 2D6 gc |
| 5-6 | Jewelled sword and dagger. These can be kept or sold at twice the value of a normal sword and dagger, but note that the normal selling price is half the actual cost (see the Trading section for rules on selling items), so the jewelled sword will sell for 10gc, for instance. |
(6 6) Ruined Hovels
The street consists of ruined hovels, which are leaning over at alarming angles. Not much worth looting here.
You find loot worth D6 gc amidst the ruins.
Triples
(1 1 1) Tavern
The ruin of a tavern is recognisable by its sign still hanging on the wall. The upper part of the building is ruined, but the cellars are cut into rock and are still full of barrels. There are broken flagons and tankards everywhere.
You could easily sell the barrels for a good price. Unfortunately your men are also interested in the contents! The warband’s leader must take a Leadership test. If he passes, the warband gains 4D6 gc worth of wines and ales which can be sold immediately.
If he fails, the men drink most of the alcohol despite their leader’s threats and curses. You have D6 gc worth of alcohol left when the warband reaches their encampment.
Undead, Witch Hunter and Sisters of Sigmar warbands automatically pass this test, as they are not tempted by such worldly things as alcohol.
(2 2 2) Smithy
The furnace and toppled anvil make it obvious what work was done here. Most of the iron and the tools have been looted long ago. Coal and slag litter the floor but there may still be weapons to be found among the debris.
Roll a D6 to determine what you find inside:
| D6 | Result |
|---|---|
| 1 | Sword |
| 2 | Double-handed weapon |
| 3 | Flail |
| 4 | D3 Halberds |
| 5 | Lance |
| 6 | 2D6 gc worth of metal (add the value to your treasury). |
(3 3 3) Prisoners
A muffled sound comes from one of the buildings. Inside you find a group of finely dressed people who have been locked in a cellar. Perhaps they are prisoners taken by cultists, ready to be sacrificed during Geheimnisnacht.
Possessed warbands can sacrifice the victims (undoubtedly finishing the job of the captors). They gain D3 Experience which is distributed amongst the Heroes of the warband.
Undead warbands can callously kill the prisoners and gain D3 Zombies at no cost.
Skaven can sell the prisoners into slavery for 3D6 gc.
Other warbands can escort the prisoners out of the city. For their trouble, they are rewarded with 2D6 gc. In addition, one of the prisoners decides he wishes to join the warband. If you can afford to equip the new recruit with weapons and armour, you may add a new Henchman to any of your human Henchman groups (with the same stats as the rest of the group, even if they have already accumulated experience).
(4 4 4) Fletcher
This hovel was once the workshop of a fletcher – a maker of bows and arrows. There are bundles of yew staves and willow rods everywhere.
Roll a D6 to see what you find:
| D6 | Result |
|---|---|
| 1-2 | D3 Short Bows |
| 3 | D3 Bows |
| 4 | D3 Long Bows |
| 5 | Quiver of Hunting Arrows |
| 6 | D3 Crossbows |
(5 5 5) Market Hall
The market hall was raised up on pillars, with the timbered corn exchange above the open market place. The upper storey has been badly damaged, but the covered market still offers a good deal of shelter. The remains of the last market day are still lying around on the cobbles. Most of this is broken pottery and iron pots.
You find several items worth 2D6 gc in total.
(6 6 6) Returning a Favour
As you are returning to your encampment, you meet one of your old acquaintances. He has come to repay an old favour or debt.
You gain the services of any one Hired Sword (choose from those available to your warband) for the duration of the next battle, free of charge. After the battle he will depart, or you may continue to pay for his upkeep as normal. See the Hired Swords section.
Four of a kind
(1 1 1 1) Gunsmith
You find the workshop of a Dwarf gunsmith. Its doors have been broken down and the rooms raided, but some of the iron strongboxes have survived intact.
Roll a D6 to see what you find:
| D6 | Result |
|---|---|
| 1 | Blunderbuss |
| 2 | Brace of Pistols |
| 3 | Brace of Duelling Pistols |
| 4 | D3 Handguns |
| 5 | D3 Flasks of Superior Blackpowder |
| 6 | Hochland Long Rifle |
(2 2 2 2) Shrine
Your warband stumbles across a ruined shrine, which is so badly damaged that it is difficult to tell which god was once worshipped within its walls. A few images remain on the painted plaster walls but they have been defaced by heretics. Fragments of smashed statues lie among the ruins. Some items appear to be covered in gold leaf, most of which has been torn off.
Your warband may strip the shrine and gain 3D6 gc worth of loot.
Sisters of Sigmar or Witch Hunter warbands may save some of the shrine’s holy relics. They will gain 3D6 gc from their patrons, and a blessing from the gods. One of their weapons (chosen by the player) will now be blessed and will always wound any Undead or Possessed model on a to wound roll of 2+.
(3 3 3 3) Townhouse
This three-storey house was once part of a tenement block overlooking a narrow alleyway. The street is now in ruins, but this house remains largely intact. Exploring it you find that the garret leans over so far that you can step out of the window into the attic of the house opposite.
Your warband finds 3D6 gc worth of loot.
(4 4 4 4) Armourer
A breastplate hanging from a pole drew your attention to this place, obviously too high up to be easily looted. The workshop is ruined and the forge has been smashed. Rooting about in the soot, you find various half-finished items of armour.
Roll a D6 to see what you find:
| D6 | Result |
|---|---|
| 1-2 | D3 Shields or Bucklers (choose which) |
| 3 | D3 Helmets |
| 4 | D3 Suits of Light Armour |
| 5 | D3 Suits of Heavy Armour |
| 6 | Suit of Ithilmar Armour |
(5 5 5 5) Graveyard
You find an old graveyard, crammed with sepulchres that are overgrown with ivy. The monuments to the dead are grotesque and decorated with sculpted gargoyles. The ironwork has been ripped from some of the tombs, and stones have toppled off. It looks as if some of the crypts have already been broken into by tomb robbers.
Any warband apart from Witch Hunters and Sisters of Sigmar may loot the crypts and graves and gains D6x10 gc worth of loot.
If you loot the graveyard, the next time you play against Sisters of Sigmar or Witch Hunters, the entire enemy warband will hate all the models in your warband. Make a note of this on your warband roster sheet.
Witch Hunters and Sisters of Sigmar may seal the graves. They will be rewarded for their piety by D6 Experience points distributed amongst the Heroes of the warband.
(6 6 6 6) Catacombs
You find an entrance to the catacombs and tunnels below Mordheim.
You can use the new tunnels you found in the next battle you play. Position up to three fighters (not Rat Ogres or the Possessed) anywhere on the battlefield at ground level. They are set up at the end of the player’s first turn and cannot be placed within 8" of any enemy models.
This represents the warriors making their way through the tunnels, infiltrating enemy lines and emerging suddenly from below ground.
Five of a kind
(1 1 1 1 1) Moneylender’s House
A grand mansion, that is strongly built from stone, has survived the cataclysm remarkably well. A carved coat of arms adorns the lintel above the doorway although it has been defaced by raiders and the symbols are now unrecognisable. The door itself, has been smashed open with axes and hangs open on its hinges.
Inside, hidden amongst the debris, you find D6x10 gc to add to your treasury.
(2 2 2 2 2) Alchemist’s Laboratory
A narrow stairway leads down into a crypt-like dwelling which was once an alchemist’s workshop. The sign still hangs from one hinge above the entrance. It looks as if this was a very old building which has remained in use for centuries although it did not survive the comet’s destruction too well. The stone floor has strange symbols on it and there are charts and astrological symbols painted onto the walls.
In the ruins you find loot worth 3D6 gc and a battered old notebook. One of your Heroes may study the Alchemist’s notebook, and the extra wisdom he gains will enable him to choose from Academic skills whenever he gains a new skill in addition to those skills normally available to him.
(3 3 3 3 3) Jewelsmith
The houses in the jewellers’ quarter have all been well and truly looted long ago. Even the rubble has been picked over many times for fragments of gold and gems. But still, some small but valuable items may have been overlooked.
Roll a D6 to see what you find:
| D6 | Result |
|---|---|
| 1-2 | Quartz stones worth D6x5 gc |
| 3-4 | Amethyst worth 20 gc |
| 5 | Necklace worth 50 gc |
| 6 | A ruby worth D6x15 gc |
If your warband does not sell the gems, one of your Heroes may keep them and displays them proudly. He will gain +1 to the rolls for locating rare items as merchants flock to such an obviously wealthy warrior.
(4 4 4 4 4) Merchant’s House
The merchant’s house stands by the waterfront. It has a vaulted stone undercroft which is still stacked with barrels and bales of cloth. The foodstuffs have been looted or eaten long ago and huge rats infest the rotting bales. Up the stairs are the dwelling quarters, solidly built of timber, although badly damaged you think you can still get up to them but you’ll need to tread with care!
Inside you find several valuable objects which can be sold for 2D6x5 gc. If you roll a double, instead of finding money you find the symbol of the Order of Freetraders. A Hero in possession of this gains the Haggle skill.
(5 5 5 5 5) Shattered Building
The comet destroyed this building almost completely, making it unsafe for all but the most daring to explore. But places such as this are the best for searching for wyrdstone shards.
You find D3 shards of wyrdstone amongst the ruins. In addition take a Leadership test against the warband leader’s Leadership value. If passed a wardog that was guarding the building joins the warband.
(6 6 6 6 6) Entrance to the Catacombs
You find a well-hidden entrance to the dark catacombs which extend for miles beneath the city of Mordheim. Although the entrance looks foreboding the tunnels will take hours off your searches of the city.
You can use these tunnels to explore Mordheim more efficiently. From now on, you may re-roll one dice when you roll on the Exploration chart. Make a note of this in your warband’s roster sheet. Second and subsequent catacomb entrances you find do not grant you any additional re-rolls, although you may find further re-rolls from other sources.
Six of a kind
(1 1 1 1 1 1) The Pit
You have come within sight of the Pit, the huge crater created by the comet. A black cloud still rises from it but you can see glowing wyrdstone everywhere. This is the domain of the Shadow Lord, the lord of the Possessed, and no-one is welcome here – even his own followers!
If you wish, you can send one of your Heroes to search for any wyrdstone hidden here. Roll a D6. On a roll of 1 the Hero is devoured by the guardians of the Pit and never seen again. On a roll of 2 or more he returns with D6+1 shards of wyrdstone.
(2 2 2 2 2 2) Hidden Treasure
In the depths of Mordheim, you come across a hidden chest, bearing the coat-of-arms of one of the noble families of the town.
When you open the chest you find the following items. Roll for every item on the list separately (apart from the gold crowns) to see whether you have found it. For example, on a roll of a 4+ you find the wyrdstone.
| Items | D6 Result Needed |
|---|---|
| D3 Pieces of wyrdstone | 4+ |
| 5D6x5 gc | Auto |
| Holy Relic | 5+ |
| Suit of Heavy Armour | 5+ |
| D3 Gems worth 10 gc each | 4+ |
| Elven Cloak | 5+ |
| Holy Tome | 5+ |
| Magical Artefact | 5+ |
(3 3 3 3 3 3) Dwarf Smithy
You find a solidly built stone workshop. A runic inscription indicates that this may have been a Dwarf smithy.
Roll a D6 to see what you find:
| D6 | Result |
|---|---|
| 1 | D3 Double-handed axes |
| 2 | D3 Suits of Heavy Armour |
| 3 | Gromril Axe |
| 4 | Gromril Hammer |
| 5 | Double-handed Gromril Axe |
| 6 | Gromril Armour |
(4 4 4 4 4 4) Slaughtered Warband
You find the remains of an entire warband. Broken bodies lay scattered among the ruins, torn apart by some monstrous creature. You see a huge shape, which looks like an immense Possessed creature, shambling away.
After giving the dead their final rites (Sisters of Sigmar or Witch Hunters), eating them (Skaven or Undead) or looting them (anyone else!) you find the following items. Roll for every item separately (apart from the gold coins and daggers) to see if you find it. For example, on a roll of 4+ you will find the suits of light armour.
| Item | D6 Result Needed |
|---|---|
| 3D6x5 gc | Auto |
| D3 Suits of Light Armour | 4+ |
| Suit of Heavy Armour | 5+ |
| D6 Daggers | Auto |
| Mordheim Map | 4+ |
| D3 Halberds | 5+ |
| D3 Swords | 3+ |
| D3 Shields | 2+ |
| D3 Bows | 4+ |
| D3 Helmets | 2+ |
(5 5 5 5 5 5) Fighting Arena
During better times, Mordheim was famous for its duellists and pit fighters. You have found one of the areas used to train these warriors. The place is filled with training equipment and practice weapons.
You find a training manual, which you can either sell for 100 gc or let one of your Heroes read. The extra knowledge your Hero gleans from reading the manual entitles him to choose from Combat skills whenever he gains a new skill, and his WS may now be increased by an extra point above his normal racial maximum (for example, a Human who has the book would now have a maximum Weapon Skill of 7).
(6 6 6 6 6 6) Noble’s Villa
You find a fine house which is partially ruined. It has been thoroughly ransacked and all the furniture has been stripped of its fine fabrics. Shards of broken pottery of the finest quality are scattered over the floor.
Roll a D6. If you roll 1-2, you find D6x10 gc worth of items and money to add to your treasury. On a roll of 3-4, you find D6 vials of Crimson Shade. On a roll of 5-6 you find a hidden magical artefact carefully concealed in a hidden cellar or behind a secret door. Roll on the Magical Artefacts table.
magical artefacts table
Roll a D6 and use this table to determine which item you find when a result in the Exploration chart indicates that you have found a magical artefact. In a campaign none of these items can appear more than once, so if you find a magic item which is already in someone else’s possession roll again – even if the warrior carrying it has been killed.
1 The Boots and Rope of Pieter
Pieter, the master thief of the Guild of Shadows, was the most famous of all the cat burglars of Mordheim. He earned the nickname ‘Spider’ for his daring robberies. The secret of his success was a pair of enchanted boots and a magical rope which he had acquired from far-off Araby.
A model wearing these boots may move normally (including running, charging, etc) on any kind of terrain, including vertical surfaces. When moving the model, simply adds the distances moved horizontally to that moved vertically, with no Initiative test needed (except to jump across gaps).
2 The Count of Ventimiglia’s Misericordia
This dagger was used by the notorious Tilean gentleman-pirate known as the ‘Black Corsair’. It is claimed that he found it in ancient Elven ruins and legend also has it that the dagger’s blade cannot be damaged in any way.
The dagger is treated as a sword. Opponents wounded by it are stunned on a result of 1-3 (Undead are knocked down as normal) and put out of action on a 4-6.
3 Att’la’s Plate Mail�
This armour was given as a present by the Dwarf Lord Kurgan to the warlord Att’la in the time of Sigmar Heldenhammer.
Att’la’s Plate Mail is a suit of Gromril Armour with the following three runes inscribed on it:
Rune of Spell Eating: The Hero wearing this armour is immune to all spells.
Rune of Passage: The Hero can move through solid objects, like walls (this does not mean that he can see through them).
Rune of Fortitude: The Hero has an extra wound. Note that this may take his total Wounds above his race’s maximum.
4 Bow of Seeking
This bow was a gift to Count Steinhardt from the Elf lords of the Forest of Shadows.
Any arrow shot using this magic bow will pursue the target and hit it even if the target is behind cover. Treat this as an Elven Bow that always hits on a 2+, regardless of any to hit modifier. Such is its deadly precision that all the arrows shot with this weapon count as Hunting Arrows (+1 on all Injury rolls).
Pick any enemy model in range, not just the closest, but the shooter must be able to see the target (even the tip of a target’s weapon is enough – as long as the shooter is aware of the presence and position of the target, he can shoot). In addition, if any Dwarf is an eligible target, the arrows will always deviate from their intended target and try to hit the Dwarf instead. For obvious reasons this bow cannot be used to shoot at Elves.
5 Executioner’s Hood
Recovered from a shipwrecked Dark Elf vessel, this hood carries evil glowing runes which fill the wearer with unreasoning rage.
A warrior wearing this becomes subject to and always will be frenzied even if he is knocked down or stunned. He also adds +1 to his Strength in close combat, such is the power of his fury. The wearer never leaves combat under any circumstances, and will always attack opponents in base contact until they are taken out of action.
If there are any stunned or knocked down models within the wearer’s charge range at the beginning of his turn, he will charge and attack the closest one, even if they are members of his own warband! Fight the hand-to-hand combat until one of the warriors is taken out of action.
6 All-seeing Eye of Numas
This jewel was recovered from the ruins of Numas far in the south. It gives its wielder horrific nightmares that predict his future.
The bearer of the All-seeing Eye can see all models on the table top, even if they are hidden or out of sight. He can guide his fellow warband members through the ruins (this allows you to roll two dice for the bearer after battle when rolling on the Exploration chart). The bearer also has an additional 6+ save (which is not modified by Strength or weapon modifiers) against all shooting attacks and strikes in close combat, as he can sense the attacks before they are made.
All animals (such as wardogs, horses, etc) will be affected by frenzy when fighting against the bearer of the All-seeing Eye.
sisters of sigmar and income
Worldly possessions mean little to the Sisters, but their holy mission to purify Mordheim of the influence of Chaos requires supplies and weaponry, and these are much in demand. Thus the warbands of the Sisterhood compete with each other to gain the best weapons and equipment from the temple’s armoury.
To measure their success, the more wyrdstone the Sisters bring to be kept under lock and key in the Vault of Vindication in the temple at Sigmar’s Rock, the more aid they will receive from the temple.
Thus all gold crowns in the possession of a Sisters of Sigmar warband represent the resources that the High Matriarch will put at their disposal. It does not represent money in a literal sense, so you may like to think of it as faith, piety, dedication, etc.
skaven and undead
Neither of these warbands puts much value on gold, but they send all the wyrdstone they find to their superiors and receive aid and resources in return. Skaven use their own currency for trading, while the Undead are somewhat beyond petty concepts of wealth. For Skaven, the gold crowns in the warband’s treasury represent the warp tokens which the Skaven use for currency, while for the Undead it represents the favour they enjoy in the eyes of their master, Vlad von Carstein of Sylvania.
spending income
You can spend any accumulated money on weapons, armour, hiring new warriors, buying new equipment or simply save the money for a bigger purchase. See the Trading section for details.