Official Quick Reference
Turn sequence
- Recovery
- Movement
- Shooting
- Close combat
Recovery
During the recovery phase you may attempt to rally any of your models that have lost their nerve. To take a Rally test, roll 2D6. If the score is equal to or less than the model’s Leadership value the model stops fleeing and has rallied. The model cannot move or shoot for the rest of the turn, but can still cast spells. If the test is failed, the model continues to flee towards the closest table edge.
A model cannot rally if the closest model to him is an enemy model.
During the recovery phase, warriors that have been stunned become knocked down instead and warriors who have been knocked down may stand up.
Movement
In your movement phase, you may move your warriors in the following order:
- Charge
- Compulsory moves
- Remaining moves
Running
A running warrior moves at twice its normal speed. A model may not run if there are enemy models within 8" at the start of the turn.
A running warrior may not hide or shoot that turn, though it may cast spells.
Charges
Without measuring the distance, declare that the model is charging and indicate which enemy warrior it is going to attack. Warriors charge at twice their normal speed.
Once opposing models are touching bases, they are engaged in hand-to-hand combat.
If there is another enemy model within 2" of the most direct charge route, it can intercept the charge.
Climbing
A warrior may climb a height equal to its Movement value in a single movement phase. Take an Initiative test. If it fails while climbing up, it cannot move that turn. If it fails while climbing down, it falls (see Falling, below).
Jumping Down
Warriors may jump down from high places, up to a maximum height of 6". Take an Initiative test for each full 2" the warrior jumps down. If it fails any of the tests the model falls down and takes damage as detailed in Falling.
Diving Charge
A warrior may make a diving charge against an enemy who is on a lower level than himself and is within 2" of the place where your warrior lands. Test for jumping down as detailed above. If the model succeeds it gains a +1 Strength bonus and +1 ‘to hit’ bonus in the handto-hand combat phase.
Jumping Over Gaps
Models may jump over gaps, up to a maximum distance of 3". (You are not allowed to measure the distance beforehand.) If your model doesn’t have enough movement left it automatically falls.
If the model covers the distance, take an Initiative test. If the model fails to pass the test it falls (see below).
Warriors Knocked Down Or Stunned
If a warrior is knocked down or stunned within 1" of the edge of a roof or building, there is a chance it will slip and fall off. Roll a D6. If the score is more than warrior’s Initiative, it will fall over the edge and take damage (see Falling, below).
Falling
Models that fall take D3 hits at a Strength equal to the height in inches of the fall. No armour saves apply.
Shooting
Hitting The Target
Use the shooter’s BS to find the D6 score needed to hit.
| BS | 1 | 2 | 3 | 4 | 5 | 6 | 7 | 8 | 9 | 10 |
|---|---|---|---|---|---|---|---|---|---|---|
| Score | 6 | 5 | 4 | 3 | 2 | 1 | 0 | -1 | -2 | -3 |
Hit Modifiers
| Modifier | Reason |
|---|---|
| -1 | Target is in cover |
| -1 | Moving & shooting |
| -1 | Long range |
| +1 | Large target |
Roll To Wound
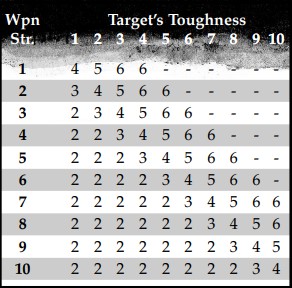
Compare the target’s Toughness against the weapon’s Strength to find the D6 score required to wound.
Wound Roll

Critical Hits
A wound roll of 6 causes a critical hit. Roll a D6 and consult the Critical Hit chart. A model may only cause one critical hit in each hand-to-hand combat phase.
Critical Hit Chart
| D6 | Result |
|---|---|
| 1-2 | Hits vital part. 1 wound = 2 wounds. Roll armour saves first. |
| 3-4 | Hits exposed spot. 1 wound = 2 wounds. No armour saves. |
| 5-6 | Master Strike! 1 wound = 2 wounds. No armour saves; +2 to Injury roll(s). |
Saving throw to avoid receiving damage from a wound. Deduct any save modifiers that apply.
| Armour | Minimum D6 score required to save |
|---|---|
| Light armour | 6 |
| Heavy armour | 5 |
| Gromril armour | 4 |
| Shield | Adds +1 to armour save. |
Injuries
As soon as a model loses its last wound roll a D6 on the Injury chart.
Injury Chart
| D6 | Result |
|---|---|
| 1-2 | Knocked down. The force of the blow knocks the warrior down. Place the model face up. |
| 3-4 | Stunned. The target falls to the ground, barely conscious. Turn the model face down. |
| 5-6 | Out of action. Remove the model from the game. |
Close combat
Who Strikes First
The model that charged its enemy strikes first. Otherwise, models fight in order of descending Initiative.
Hitting The Enemy
Roll a D6 for each model fighting. If the model has more than 1 Attack roll a D6 for each attack.
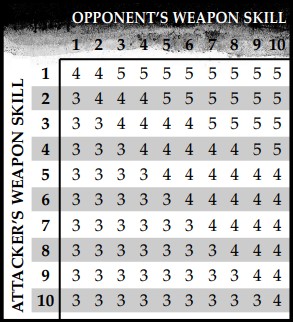
Compare the WS of the attacker with the WS of his opponent and consult the following chart to find the minimum D6 score needed to hit.
Hit Roll

Roll To Wound
Compare the target’s Toughness against the weapon’s Strength to find the D6 score required to wound (see the To Wound chart in Shooting, above).
Armour Save Modifiers
The higher a creature’s Strength the more easily it can pierce armour. The chart below shows the reduction in the enemy’s armour saving throw compared to the attacker’s Strength.
| Str | 1-3 | 4 | 5 | 6 | 7 | 8 | 9+ |
|---|---|---|---|---|---|---|---|
| Save Mod. | None | -1 | -2 | -3 | -4 | -5 | -6 |
Warriors Knocked Down
If an enemy model is fighting a warrior who is knocked down, he may attack him to put him out of action.
Roll to wound as normal. If any of the attacks wound, take an armour save modified by the Strength of the attacker as normal. If the save is failed, the warrior is automatically out of action.