Movement
During the movement phase models are moved in the following order:
1. Charge!
If you want a model in your warband to charge at an enemy model and attack it in hand-to-hand combat then you must do this at the start of the movement phase before moving any of your other models. When you charge a model, declare to your opponent that you are doing so and indicate which of his models it is attacking.
2. Compulsory Moves
Sometimes a model is forced to move in a certain way and this is called a compulsory move. For example, a fighter whose nerve breaks must run away from his enemies and take cover. Make all of your models’ compulsory moves before finishing any remaining movement.
3. Remaining Moves
Once you have moved your chargers and made any compulsory moves, you may move the rest of your warriors as you see fit.
moving
During their movement phase, models can move up to movement rate their in any direction. They may move (including running and charging) up and down ladders and stairs, and over low obstacles such as barrels, boxes, etc.
In normal circumstances models don’t have to move their full distance, or at all if you do not want them to. All exceptions are explained later and invariably involve either charging or compulsory moves.
running
The normal Movement value of models represents a warrior moving at a fairly rapid rate, but allows time for him to aim and shoot a weapon and generally observe what is going on around him. If you wish, a model may move much quicker than this – he can run! A running warrior can move at double speed (for example, 8" rather than 4"). Note that running is not the same as charging as it does not allow your model to engage the enemy in hand-to-hand combat.
A model can only run if there are no enemy models within 8" of it at the start of the turn (fleeing, stunned, knocked down and hidden models do not count). Check this distance after any charges have been declared. If there are any enemies within 8" at the start of the turn, the model will prepare to fight instead and so is unable to run. The running model can move closer than 8" to an enemy as it moves.
Any model that runs loses its chance to shoot during that turn. He is concentrating on running and is not prepared to fight, having sheathed or shouldered his weapons. You should declare that models are running as they move, as this will remind both players that the model is unable to shoot that turn. Running models can cast spells as normal.
charge!
If you want a model to engage the enemy in hand-to-hand combat then you must make a special move called a charge. Without measuring the distance, declare that your model is charging and indicate which enemy model he is going to attack.
You can charge any opposing model if you can draw an unobstructed line from your model to the target. If your warrior wants to charge an enemy model within 4" that he can’t see (eg, because it is behind a corner) but has not been declared as hidden, he must pass an Initiative test to detect it. If he fails the roll, your model may not charge this turn, but may move his normal distance, shoot and cast spells.
A charge is like a running move, performed at double the Movement rate, but ends with the attacker moving by the most direct route into base-to-base contact with the enemy model. Once their bases are touching they are engaged in hand-to-hand combat. Models are also considered to be in hand-to-hand combat even when separated by a low wall or obstacle, where it is impossible for the bases to touch physically because the obstacle is in the way.

If an unengaged (ie, not in hand-to-hand combat) enemy model lies within 2" of the charge route, that model may choose to intercept the charger if he wishes. This ‘interception area’ is shown in the diagram above. Only one enemy model may attempt to intercept each charger.
If the intercepting warrior would normally require a fear test to engage the charger then he must pass one in order to be allowed to intercept. Failure means he will not move. If the intercepting warrior causes fear then move the models into contact and then take a Fear test for the original charger (assuming he would normally do so) as if he was the one being charged. Regardless of the results of this test it is still the original charger who counts as charging in the subsequent round of combat, not the intercepting warrior.
Sometimes a charging warrior may not reach the enemy because you have miscalculated the distance. If this happens move your warrior his normal move distance towards the enemy. This is called a failed charge. The model cannot shoot in the same turn in which he failed a charge, but he can cast spells as normal.
Models cannot be moved into hand-to-hand combat except by charging – any move that brings a warrior into hand-to-hand combat is a charge by definition. A model that charges will ‘strike first’ in the first round of the ensuing combat.
charging more than one opponent
If you can move your warrior into base contact with more than one enemy model with its charge move, it can charge them both. This might be inadvisable as it’ll then be fighting two enemies at once!
hiding
The Hiding rule represents warriors concealing themselves in a way that our unmoving and dramatically posed models cannot. A hiding warrior keeps as still as possible, just peeking out of cover.
A model can hide if he ends his move behind a low wall, a column or in a similar position where he could reasonably conceal himself. The player must declare that the warrior is hiding and place a Hidden counter beside the model for it to count as being hidden.
A model that runs, flees, is stunned or charges cannot hide that turn. His sudden burst of speed does not give him time to hide.
A model may stay hidden over several turns, so long as he stays behind a wall or similar feature. He may even move around so long as he stays hidden while doing so. If an enemy moves so that he can see the hidden warrior, the model is no longer hidden and the counter is removed. When hidden, a warrior cannot be seen, shot at or charged.
While hiding, a model cannot shoot or cast spells without giving away its position. If a hidden model shoots, or moves so that he can be seen, he is no longer hidden and can be shot at as normal.
A model may not hide if he is too close to an enemy model – he will be seen or heard no matter how well concealed. Enemy warriors will always see, hear or otherwise detect hidden foes within their Initiative value in inches. So a warrior whose Initiative value is 3 will automatically spot all hidden enemies within 3".
terrain
The ruined city of Mordheim is a dark and dangerous place, where tumbled down towers and blasted houses form a vast maze of streets and alleyways.
open ground
The tabletop surface, floors of buildings, connecting overhangs, ladders and ropes are all considered to be open ground and will not affect movement even if the model is charging. It can also go through doors and hatches without slowing down.
difficult ground
Difficult ground includes steep or treacherous slopes, bushes and the angled roofs of buildings. Models move at half speed over difficult terrain.
very difficult ground
This is really dangerous terrain, such as narrow crawlholes through the rubble. Models may move at a quarter rate, so if the model moves 4" over open ground it can only move 1" over very difficult ground.
walls And barriers
Walls, hedges and other low obstacles form barriers that you can either go around or leap over. A model can leap over a barrier that is less than 1" high. This does not affect its movement in any way.
climbing
Often the ruined buildings of Mordheim do not have stairs or ladders, so your warriors will have to climb to reach the upper floors of buildings.
Any model (except animals!) can climb up or down fences, walls, etc. He must be touching what he wants to climb at the start of his movement phase. He may climb up to his total Movement in a single movement phase (but cannot run while he is climbing). Any remaining movement can be used as normal. If the height is more than the model’s normal move, he cannot climb the wall.
To climb, a model must take an Initiative test. If he fails it whilst climbing up, he cannot move that turn. If he fails it while climbing down, he falls from where he started his descent (see the Falling section).
jumping down
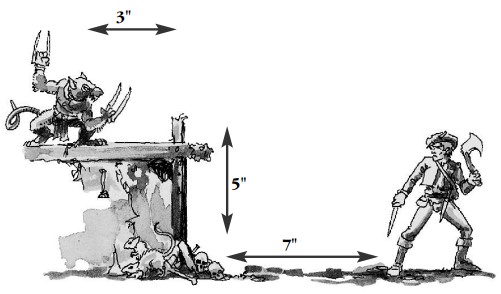
The Skaven runs/charges from the top of a building, jumping
down during the move. It moves 3" to reach the edge, then
jumps down and has to see whether it can safely make it to the
ground. As it has to jump down 5", it must pass two Initiative
tests to avoid taking D3 S5 hits. If it fails it will stop its move at
the bottom of the wall (if it is not taken out of action). If it
passes both tests, it can continue its run/charge and move the
remaining 7"
Your warrior may jump down from high places (up to a maximum height of 6") such as walkways and balconies at any time during his movement phase. Take an Initiative test for every full 2" he jumps down. If he fails any of the tests, the model falls from the point where he jumped, takes damage (see Falling) and may not move any more during the movement phase. If successful, the model can continue his movement as normal (jumping down does not use up any of the model’s Movement allowance).
diving charge
You may charge any enemy troops that are below a balcony or overhang, etc, that your model is on. If an enemy model is within 2" of the place where your warrior lands, he may make a diving charge against it. Take an Initiative test for each full 2" of height your model jumped down from, up to a maximum of 6", like a normal jump. If he fails any of them, your model has fallen and suffers damage, may not move any more during the movement phase and cannot charge the enemy. If he succeeds, the model gains a +1 Strength bonus and +1 to hit bonus but only during the following hand-to-hand combat phase.
jumping over gaps
Models may jump over gaps (up to a maximum of 3") and streets, (eg, from the roof of a building to another). Deduct the distance jumped from the model’s movement but remember that you cannot measure the distance before jumping. If your model does not have enough movement to jump the distance, he automatically falls. If your model is able to cover the distance, he must pass an Initiative test or fall. A model may jump over a gap and still fire a missile weapon if it is not running. It may also jump as part of its charge or running move.
warriors knocked down or stunned
If a warrior is knocked down or stunned within 1" of the edge of a roof or building, there is a chance that it will slip and fall off. Take an Initiative test. If the test is failed, the model falls over the edge to the ground and takes damage as detailed below.
falling
A model that falls takes D3 hits at a Strength equal to the height in inches that it fell (eg, if the model fell 4", it would take D3 hits at Strength 4). No armour saves apply. Falling will not cause critical hits. A model that falls may not move any further or hide during that turn, even if it is not hurt.