Shooting
Warriors that fight in the ruins of Mordheim are usually armed to the teeth! Individual warriors often have several different weapons such as swords, knives, bows and even blackpowder weapons. During your warband’s shooting phase each of your warriors may shoot once with one of his weapons. This means that he can fire a bow, shoot with a crossbow, or hurl a throwing knife, for example. Work through the models one at a time. Pick which fighter is going to shoot, nominate his target, work out whether he hits the enemy and, if he does, any wounds or injuries that are caused. Then continue with the next shooter. You can take shots in any order you wish. Be sure to remember or note down which models have already shot.
who can shoot
Each model can shoot once in the shooting phase, so long as he can see a target and assuming he has a suitable weapon. He may not fire in the following circumstances: if he is engaged in hand-to-hand combat, has run or failed a charge in the movement phase, has rallied this turn or is stunned or knocked down.
To shoot at a target, a model must be able to see it, and the only way to check this is to stoop over the tabletop for a model’s eye view. Models can see all around themselves (ie, 360°), and they may be turned freely to face in any direction before firing. Note that turning on the spot does not count as moving.
closest target
You must shoot at the closest enemy, as he represents the most immediate threat and therefore the most obvious target. However, you may shoot at a more distant target if it is easier to hit or if closer models are stunned or knocked down (see diagram on next page). For example, a closer target may be hard to hit because it is in cover, whilst a more distant target might be in the open and therefore an easier shot.
You may always choose to shoot at a Large Target if you can see it, whether it is in cover or not and even if it is not the closest target.
You can shoot at models that are fleeing, knocked down or stunned, but you can choose to ignore them, because they do not represent an immediate threat. It is better to shoot the closest standing enemy model instead.
Note that you may not shoot at models that are engaged in hand-to-hand combat, as the risk of hitting your comrades is too great.
cover
The many walls, ruined buildings and other masonry in Mordheim offer plenty of cover. If any portion of the target is hidden by a piece of scenery or another model, the shooting model will suffer a penalty as explained below.
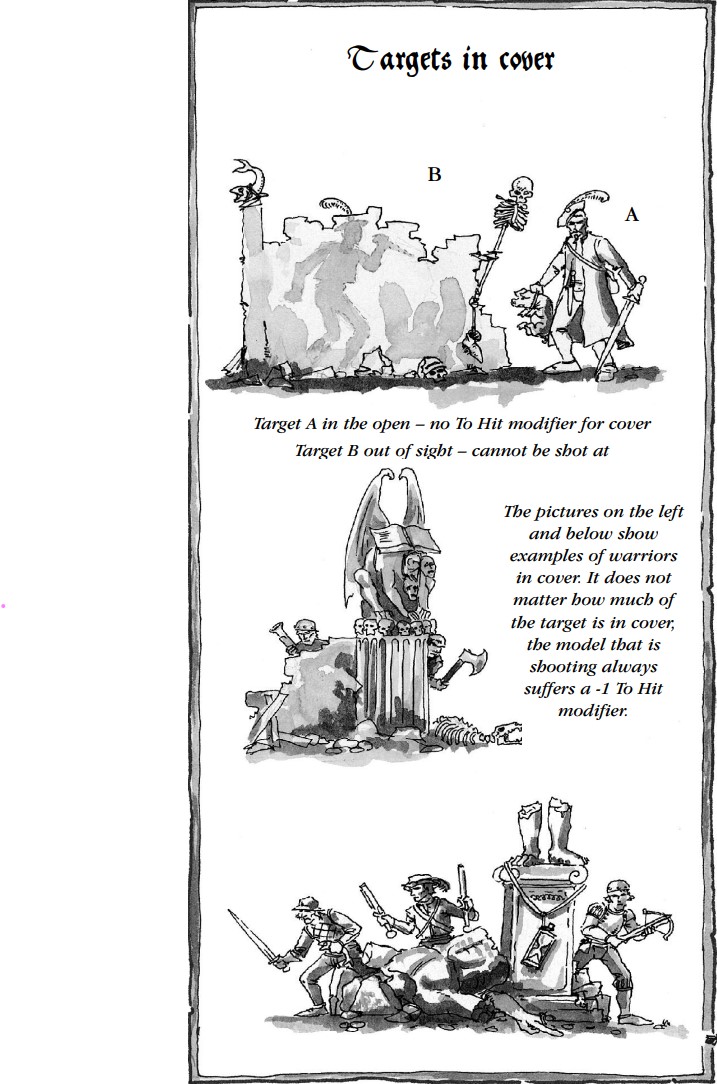
Sometimes it will be obvious whether a target can be seen; at other times it will be more difficult, as buildings and other scenery are in the way. If the shooter can see only part of the target’s body, the target is in cover and the shooter suffers a -1 penalty on his To Hit roll.
If a shot misses its target by 1, and that target claimed the -1 modifier for cover, then the shot strikes the cover instead. Normally this doesn’t matter, but in the case where a model is concealed behind another warrior, or when the cover is a powder keg, it might be extremely important!
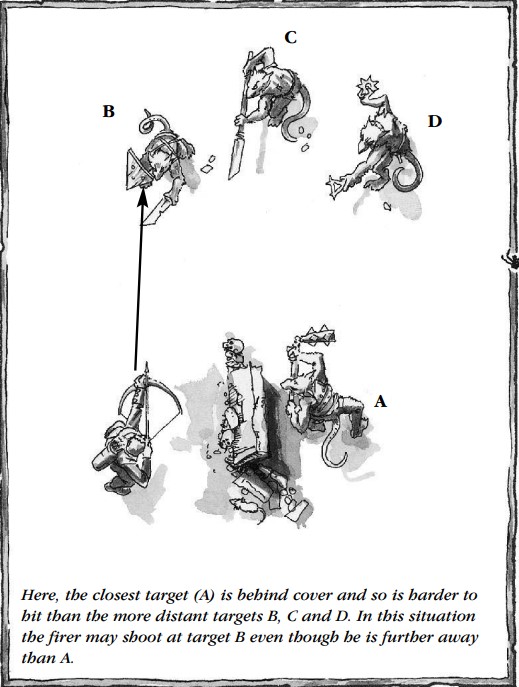
Here, the closest target (A) is behind cover and so is harder to hit than the more distant targets B, C and D. In this situation the firer may shoot at target B even though he is further away than A
shooting from an elevated position
A model situated in an elevated position (ie, anything that is more than 2" above the table surface, such as an upper floor of a building), may freely pick any target he can see and shoot at it. The exception to this rule is that if there are enemies in the same building and in line of sight of the shooter, he must shoot at these, as they present a more immediate threat.
range
Once you have decided to shoot and have chosen a target you must measure to see whether the shot is within range. Each type of missile weapon has a maximum range, as described in the Weapons & Armour section of the book.
Assuming that your target is within range your warrior can proceed with the shot. If the target is out of range then he has automatically missed this turn.
hitting the target
To determine whether a shot hits its target, roll a D6. The dice score needed will depend upon how good a shot the firer is (as indicated by his Ballistic Skill). The chart below shows the minimum D6 roll needed to score a hit.
| BS of shooter | 1 | 2 | 3 | 4 | 5 | 6 | 7 | 8 | 9 | 10 |
|---|---|---|---|---|---|---|---|---|---|---|
| D6 roll needed | 6 | 5 | 4 | 3 | 2 | 1 | 0 | -1 | -2 | -3 |
wound chart
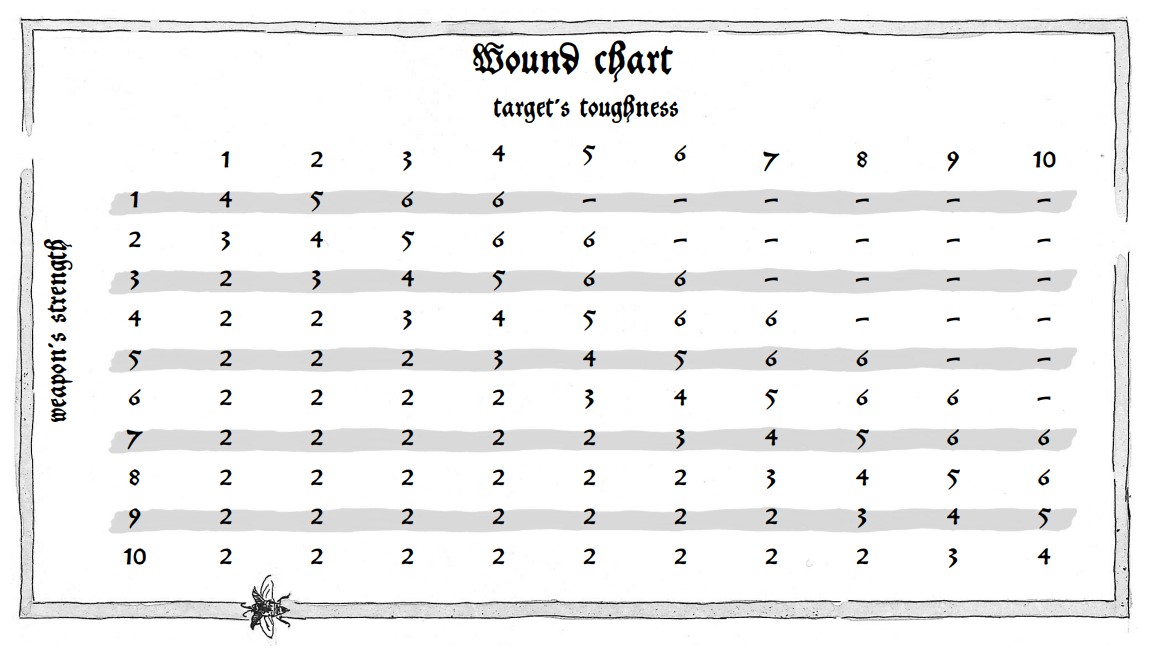
target's toughness (horizontal) vs weapon strength (vertical)
| 1 | 2 | 3 | 4 | 5 | 6 | 7 | 8 | 9 | 10 | |
|---|---|---|---|---|---|---|---|---|---|---|
| 1 | 4 | 5 | 6 | 6 | – | – | – | – | – | – |
| 2 | 3 | 4 | 5 | 6 | 6 | – | – | – | – | – |
| 3 | 2 | 3 | 4 | 5 | 6 | 6 | – | – | – | – |
| 4 | 2 | 2 | 3 | 4 | 5 | 6 | 6 | – | – | – |
| 5 | 2 | 2 | 2 | 3 | 4 | 5 | 6 | 6 | – | – |
| 6 | 2 | 2 | 2 | 2 | 3 | 4 | 5 | 6 | 6 | – |
| 7 | 2 | 2 | 2 | 2 | 2 | 3 | 4 | 5 | 6 | 6 |
| 8 | 2 | 2 | 2 | 2 | 2 | 2 | 3 | 4 | 5 | 6 |
| 9 | 2 | 2 | 2 | 2 | 2 | 2 | 2 | 3 | 4 | 5 |
| 10 | 2 | 2 | 2 | 2 | 2 | 2 | 2 | 2 | 3 | 4 |
hit modifiers
It is easier to hit a target that is in the open compared to a target behind cover. Usually it is also easier to hit a target if it is close compared to one further away. These situations are represented by the following modifiers:
| Modifier | Reason | Description |
|---|---|---|
| -1 | Cover | If any part of the model is obscured by scenery or other models then it counts as being in cover. |
| -1 | Long range | If you are shooting at a target that is more than half of your weapon’s maximum range away. |
| -1 | Moving & shooting | If your model has moved at all (other than standing up, or turning to face your target) during this turn. |
| +1 | Large target | If either the target model has the Large Target special rule (such as an Ogre), or whose main ‘body’ is over 2" tall or wide (such as most buildings). |
critical hits
If you roll a 6 when rolling to wound (for hand-to-hand combat and shooting only) you will cause a critical hit. Roll a D6 and consult the Critical Hit chart below to determine the damage caused by the critical hit. You should also roll to see whether the target makes its armour save or suffers damage as normal.
In addition, if the attacker normally needs 6s to wound his target, he cannot cause a critical hit. His opponent is simply too tough to suffer a serious injury at the hands of such a puny creature!
Each warrior may only cause one critical hit in each hand-to-hand combat phase (see the Close Combat section), so if he has several attacks, the first 6 you roll to wound will cause a critical hit.
critical hit chart
| D6 | Result |
|---|---|
| 1-2 | Hits a vital part. The wound is doubled to 2 wounds. Roll any armour saves before doubling the wound. |
| 3-4 | Hits an exposed spot. The wound is doubled to 2 wounds. The attack ignores all armour saves. |
| 5-6 | Master strike! The wound is doubled to 2 wounds. The attack ignores all armour saves. You gain +2 to any Injury rolls. |
If a critical hit causes more than 1 wound, and the weapon the attacking model is using normally causes several wounds, then use the one that causes the most damage.
armour
Steel breastplates, chainmail, leather tunics, shields… all these and more are readily available in the forges of the villages surrounding Mordheim. That is if you are prepared to pay the price, since armour is very expensive.
If a warrior wearing armour suffers a wound roll a D6. If the dice roll is sufficiently high the wounding hit has bounced off the armour and has not hurt the wearer at all. The dice score required varies according to the type of armour.
The table below summarises the most common armour types and the D6 rolls required to make a save. Note that carrying a shield increases the save by +1. For example, a warrior in light armour with a shield will save on a roll of a 5 or 6. A warrior who has a shield but no armour will save on a roll of a 6.
| Armour | Minimum D6 score required to save |
|---|---|
| Light armour | 6 |
| Heavy armour | 5 |
| Gromril armour | 4 |
| Shield | adds +1 to the armour save |
armour save modifiers
Some weapons are better at penetrating armour than others. A shot from a short bow can be deflected relatively easily, but a shot from a crossbow penetrates armour much more effectively.
The higher a weapon’s Strength, the more easily it can pierce armour. The chart below shows the reduction to the enemy’s armour saving throw for different Strength weapons.
| Strength | Save modifier |
|---|---|
| 1-3 | None |
| 4 | -1 |
| 5 | -2 |
| 6 | -3 |
| 7 | -4 |
| 8 | -5 |
| 9+ | -6 |
Some weapons are better at penetrating armour than their Strength value suggests (Elven bows, for example). This is covered in the entry for each particular weapon (see the Weapons & Armour section).
Example: Dieter wears heavy armour and carries a shield. His armour save is 4+. He is hit by a crossbow (Strength 4) and therefore he will save on a D6 roll of 5+ (ie, 4+–1=5+).
WARD SAVES
Some troops types and creatures are protected by more than mere physical armour. They may be shielded by magical charms or blessings, given protection by the gods of the Warhammer world, or perhaps they are just astoundingly lucky.
Models with this sort of protection are referred to as having a Ward save or Ward. This type of save is quite different from an armour save and it is very important to understand the difference from the beginning.
Wards represent magical or divine protection which can save a warrior when armour would be of no use at all. Unlike an armour save, a Ward is never modified by Strength modifiers, etc. Even if a hit ignores all armour saves, a model with a Ward may still try to take its Ward save as normal. A model may only ever take one Ward save against each wound it has suffered.
Sometimes a model has both an armour save and a Ward save. In this case, the model must take the armour save first and, if it is failed, the model is allowed to try to make a Ward save. No model can ever try to make more than one Ward save against a wound it has suffered. If a model has two Ward saves for any reason, use the better Ward save.
The above is copied from the 6th edition Warhammer Fantasy rulebook. Mordheim was released during 5th edition and did not include ward saves. Later warbands however, were released during 6th edition and referred to special saves as Ward saves.
injuries
Most warriors have a Wounds characteristic of 1, but some have a value of 2 or more. If the target has more than 1 wound then deduct 1 from his total each time he suffers a wound. Make a note on the roster sheet. So long as the model has at least 1 wound remaining he may continue to fight.
As soon as a fighter’s Wounds are reduced to zero, roll to determine the extent of his injuries. The player who inflicted the wound rolls a D6 for the wound that reduced the model to zero wounds and for every wound the model receives after that. If a model suffers several wounds in one turn, roll once for each of them and apply the highest result.
| D6 | Result |
|---|---|
| 1-2 | Knocked down. The force of the blow knocks the warrior down. Place the model face up to show that he has been knocked down. |
| 3-4 | Stunned. The target falls to the ground where he lies wounded and barely conscious. Turn the model face down to show that he has been stunned. |
| 5-6 | Out of action. The target has been badly hurt and falls to the ground unconscious. He takes no further part in the game and is immediately removed from the battle. |
knocked down
A fighter who has been knocked down falls to the ground either because of a jarring blow he has sustained, because he has slipped, or because he has thrown himself to the ground to avoid injury. Turn the model face up to show that he has been knocked down. Knocked down models may crawl 2" during the movement phase, but may not fight in hand-to-hand combat, shoot or cast spells. If he is in base-to-base contact with an enemy, a knocked down model can crawl 2" away only if the enemy is engaged in hand-to-hand combat with another opponent, otherwise he has to stay where he is. In combat he cannot strike back and the enemy will have a good chance of putting him out of action (see the Warriors Knocked Down section of the Close Combat rules).
A warrior who has been knocked down may stand up at the start of his next turn. In that turn he may move at half rate, shoot and cast spells, he cannot charge or run. If he is engaged in hand-to-hand combat, he may not move away and will automatically strike last, irrespective of weapons or Initiative. After this turn the fighter moves and fights normally, even though he has zero wounds left. If the model takes any further wounds, then roll for injury once more, exactly as if the model had just sustained its last wound.
stunned
When a warrior is stunned, he is either badly injured or temporarily knocked out. Turn the model face down to show that he has been stunned. A fighter who is stunned may do nothing at all. A player may turn the model face up in the next recovery phase, and the warrior is then treated as knocked down.
out of action
A warrior who is out of action is also out of the game. Remove the model from the tabletop. It’s impossible to tell at this point whether the warrior is alive or dead, but for game purposes it makes no difference at this stage. After the battle you can test to see whether he survives and if he sustains any serious lasting injuries as a result of his wounds (see Serious Injuries for details).